
These beautiful flowers will flutter in the breeze! Continue reading

These beautiful flowers will flutter in the breeze! Continue reading
 This quick and easy cultural craft is also useful both inside and outside the classroom! Continue reading

Marquetry is the art of using thin pieces of veneer to craft beautiful images and patterns. Now you can create your own beautiful marble marquetry! Continue reading

Create cute, miniature people who can stand on their own two feet! Continue reading
 Bring color and beauty to the classroom with these simple but beautiful tiles!
Continue reading

Need a few extra fingers to count with? These hand-sized books make perfect math manipulatives! Continue reading

The ultimate fine motor skills craft, kids will cut, lace and tie to create this old-style hide rack! Continue reading

Are you looking for Easter egg ideas? The sensory collage Easter egg art project is great for your classroom activities. It introduces children to the important senses of the human body with Roylco’s Sensory Collage Kit. It’s also great for working on fine motor skills.
Age: 5+
Duration: 15 minutes
Learning Outcomes: Exercise fine motor skills. Practice sorting materials by color and texture. Learn about collage art. Develop sensory awareness.
You’ll Need:

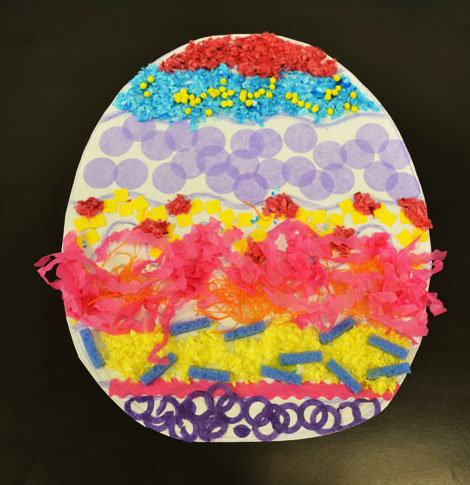
Pull out a wavy sheet from the R15413 Sensory Paper package, choose your favorite pastel color, and draw an outline of an egg. Encourage kids to slowly move their palms and fingertips over the paper to feel the small raised patterns. Some kids may want to follow the patterns on the paper to create their designs, while others may want to create their own designs. You can color the wavy lines on the paper and it will divide the egg into different sections. You can make these lines as bold as you like.

Next, plan and place the sensory art materials you like on your egg. The Sensory Collage Kit contains 20 different sensory art packs to use in creating unique illustrations.
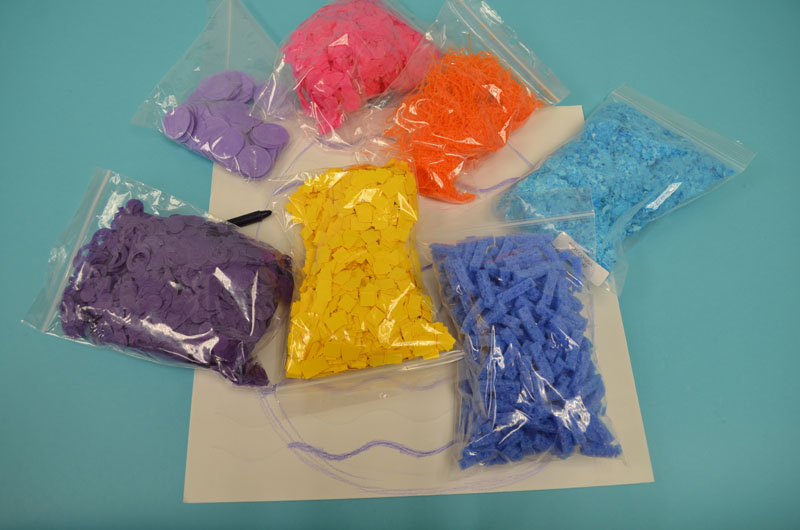
Before gluing the sensory art materials onto the artwork, you can play with the colors and the different textures. Think about which sensory art materials would best represent your Easter egg artwork.

Encourage children to talk about the color and the texture they use on the artwork and discuss what they feel. Is the color a warm color or a cool color? Is the material rough, hard, scratchy, smooth or bubbly? After exploring the materials, children can start to glue the sensory materials onto the artwork.

The artwork is almost finished. Have the children cut out the egg and glue it on to the cardstock. Here is our sensory collage Easter egg artwork. Write your name on the artwork and take it home for your Easter celebration!
For more information please visit http://roylco.com/shop/r75419-sensory-collage-kit

Are you looking for more Easter ideas this week? Making origami rabbit is fun and easy. Today we are going to show you how to make these cute origami rabbits.
Age: 4+
Duration: 6 Minutes
Learning Outcomes: Practice following step-by-step instructions while exercising fine motor and spatial skills.
You’ll Need:


Step-by-step Instructions ( Please see the graphic above ):
Ideas:
Please visit http://roylco.com/shop/15219-elementary-origami-animals
for more information.

Make beautiful color diffusing Easter Egg Artwork by using Roylco’s R15213 Color Diffusing Paper™!
Age: 3+
Duration: 5 minutes for painting and assembling, couple of hour for drying.
Learning Objectives: Use fine motor skills to squeeze paint from pipettes onto paper. Learn about the process of diffusion with beautiful Color Diffusing™ technology.
You’ll Need:
• R15213 Color Diffusing Paper™
• R54470 Junior Heart Paint Pipettes
• Watercolor paint
• Paint tray
• A Cup of water
• Cardstock

Use white chalk to draw an outline of an egg on to Roylco’s R15213 Color Diffusing Paper™ . Then create some patterns to design your egg. I also wrote ” Happy Easter” in the middle of the egg. Encourage children to use their imagination to create their own designs.

Next, place the paper in the paint tray. Wet the R15213 Color Diffusing Paper™, and use Roylco’s R54470 Junior Heart Paint Pipettes to drip liquid watercolor paint over top of the wet surface. Encourage children to experiment with different color palettes. It’s lots of fun for children to play with different colors and watch the colors flow and blend to create spectacular patterns and effects.. This is a great time for children to learn about color mixing, ask the children to discuss the effects of color mixing.

Let the artwork dry in the paint tray for couple of hours. You can also use a blow dryer to dry the artwork. You can see the result is unexpected and beautiful.
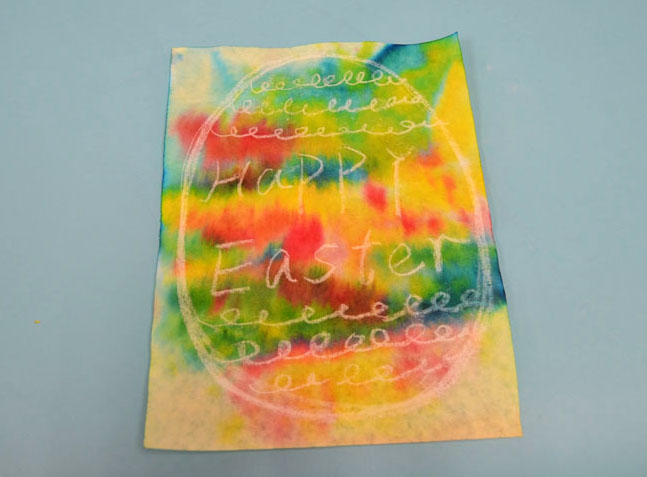
The color diffusing Easter egg artwork is almost ready. Once the paint is dry, you can cut the egg out and glue it on to the cardstock.

For more information please visit http://roylco.com/shop/r15213-color-diffusing-paper

Today we are going to show you some fun ways to dye your Easter Eggs.
Age: 4+
Duration: 10 minutes ( Not including drying time )
Learning Outcomes: • Develop fine motor skills • Explore creativity
You’ll Need:
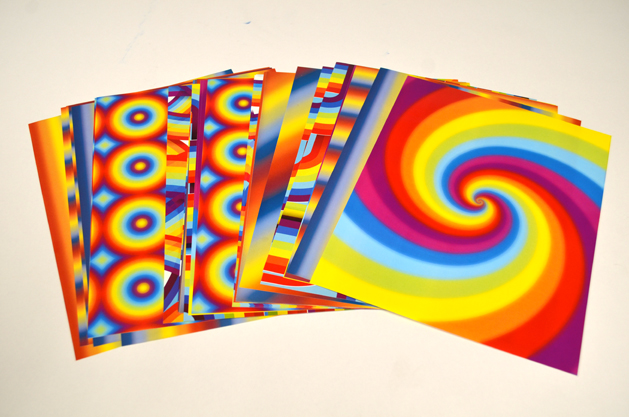
You can use Roylco’s R22054 Lace Design Paper or R15214 Super Value Color Diffusing Paper™ to dye your eggs.
Please see the graphic below. We used both papers. The different texture and design of the paper will create different dying results on the Easter eggs.


3. Use the same technique to dye the eggs with different colors.
4. Place the eggs in the paint tray. Let them dry. It will take around 6 hours for them to dry. To speed up the drying, you can use a blow dryer.
All the eggs are dry now! Let’s open them!
You can see the spectacular patterns and colors on the eggs. You can use your eggs as decorations or have an Easter Egg hunt. Enjoy them!


Are you looking for craft ideas for St. Patrick’s Day? Create some decorations to make the house and classroom more festive. Lets make a spiral rainbow and pot of gold.
Age: 4+
Duration: 5 minutes
Learning Outcomes: Exercise fine motor skills. holiday activities. Makes a perfect take-home craft.
You’ll Need:
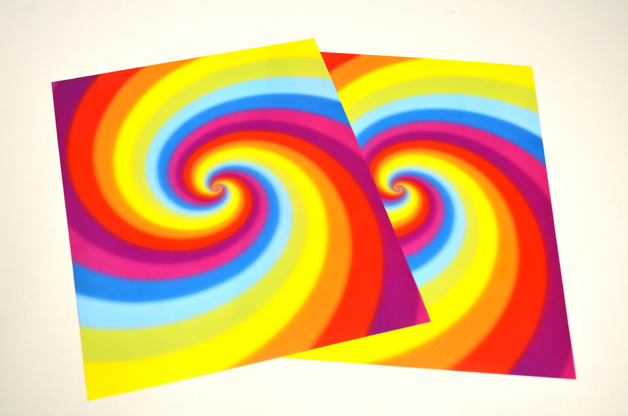
Choose your favorite pattern from Roylco’s R15295 Rainbow Paper Pack.
Draw a spiral at the back of the paper.
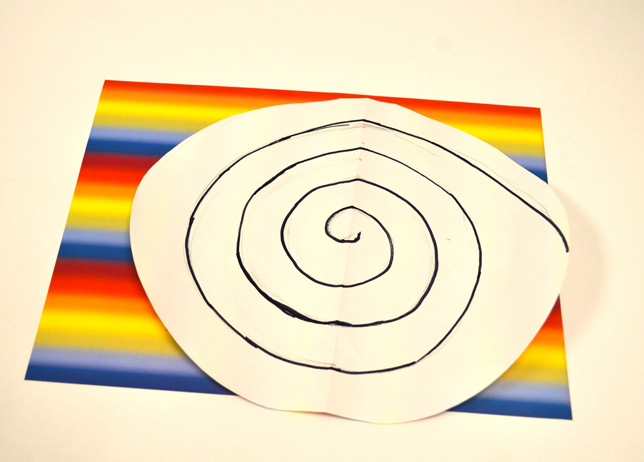
You can also glue two pieces of rainbow paper together to create a double-sided sprital.
Use scissors to cut from the end of the outline toward the center to make a spiral.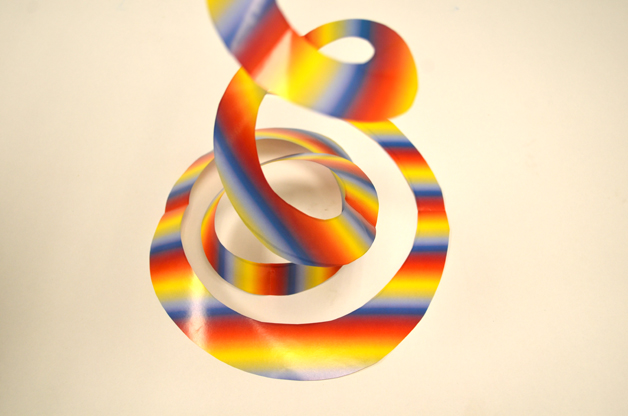
Take two pieces of metallic paper from Roylco’s R15409 Economy Metallic Paper Pack.
I choose dark green paper to make the pot, and the gold colored paper for the golden coins. Draw the shape of a pot at the back of the green paper, and cut it out. Make the coins by cutting out some circle shapes from the gold paper. Then glue the golden coins on to the green pot.

After you finish making a pot of gold, you can glue it to the end of the rainbow. Once complete, hang from ceilings, on bulletin boards or anywhere that could use some extra color.
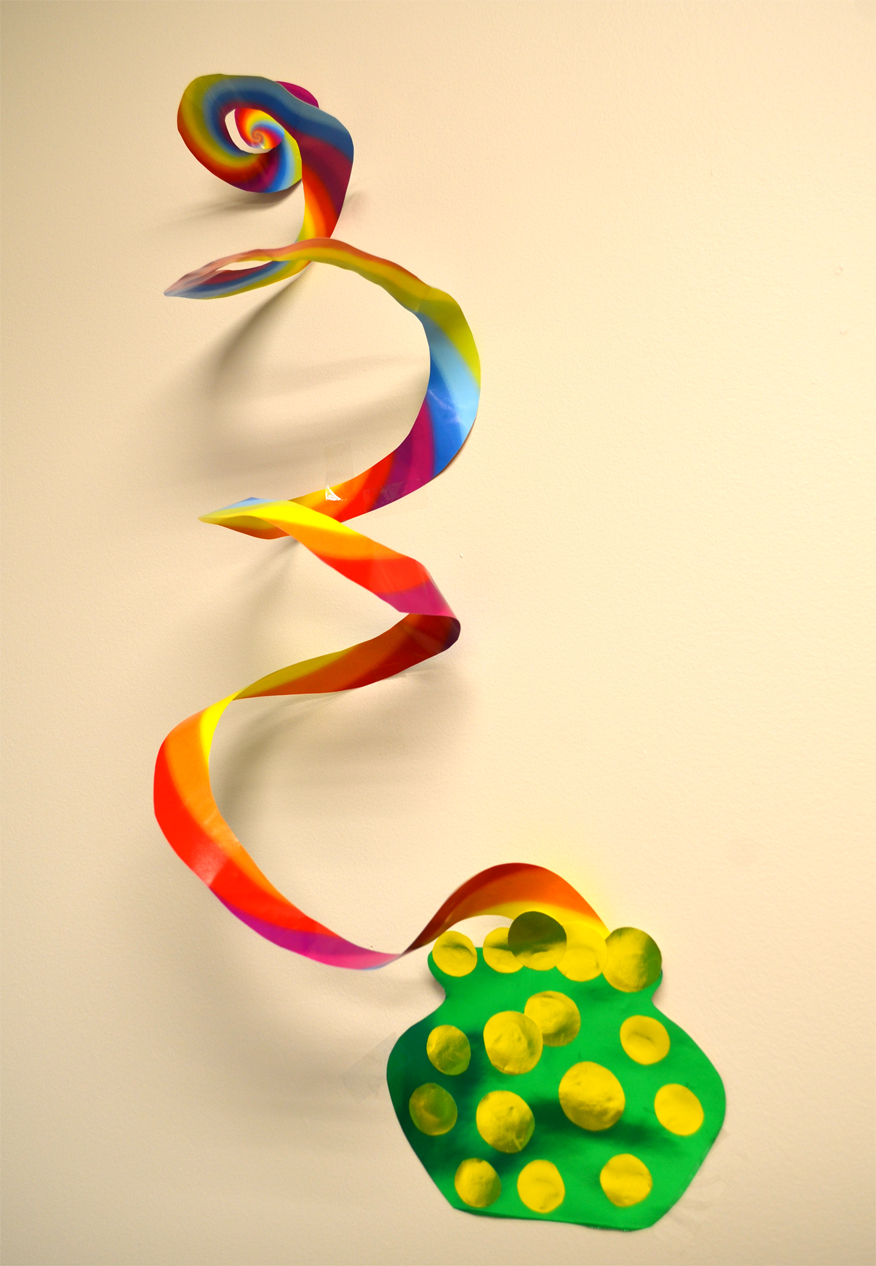
You are the pot of gold at the end of my rainbow!
