Sensory Collage Easter Egg Art Project

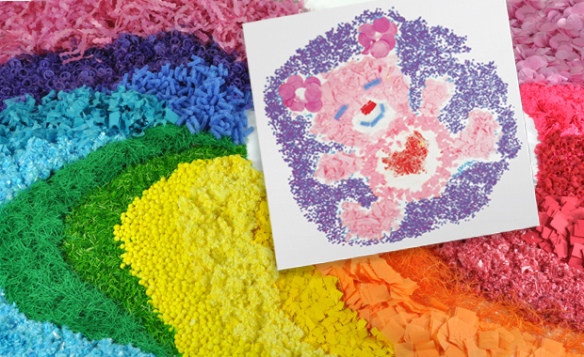
Are you looking for Easter egg ideas? The sensory collage Easter egg art project is great for your classroom activities. It introduces children to the important senses of the human body with Roylco’s Sensory Collage Kit. It’s also great for working on fine motor skills.

Age: 5+

Duration: 15 minutes

Learning Outcomes: Exercise fine motor skills. Practice sorting materials by color and texture. Learn about collage art. Develop sensory awareness.

You’ll Need: 

Pull out a wavy sheet from the R15413 Sensory Paper package, choose your favorite pastel color, and draw an outline of an egg. Encourage kids to slowly move their palms and fingertips over the paper to feel the small raised patterns. Some kids may want to follow the patterns on the paper to create their designs, while others may want to create their own designs. You can color the wavy lines on the paper and it will divide the egg into different sections. You can make these lines as bold as you like.

Next, plan and place the sensory art materials you like on your egg. The Sensory Collage Kit contains 20 different sensory art packs to use in creating unique illustrations.

Before gluing the sensory art materials onto the artwork, you can play with the colors and the different textures. Think about which sensory art materials would best represent your Easter egg artwork.

Encourage children to talk about the color and the texture they use on the artwork and discuss what they feel. Is the color a warm color or a cool color? Is the material rough, hard, scratchy, smooth or bubbly? After exploring the materials, children can start to glue the sensory materials onto the artwork.

The artwork is almost finished. Have the children cut out the egg and glue it on to the  cardstock. Here is our sensory collage Easter egg artwork. Write your name on the artwork and take it home for your Easter celebration!

For more information please visit http://roylco.com/shop/r75419-sensory-collage-kit


Make your own Origami Rabbit

Are you looking for more Easter ideas this week? Making origami rabbit is fun and easy. Today we are going to show you how to make these cute origami rabbits.

Age: 4+

Duration: 6 Minutes

Learning Outcomes: Practice following step-by-step instructions while exercising fine motor and spatial skills.

You’ll Need: 

Step-by-step Instructions ( Please see the graphic above ):

  1. Fold your paper in half to make a triangle.
  2. Fold the creased side of the triangle up about 3/4″.
  3. Fold one side toward the center, line up the points and crease.
  4. Fold another side toward the center. Line up the points and crease.
  5. Fold the bottom up.
  6. Flip it over. Fold the top point inside to create the top of the rabbit’s head. You can see the rabbit’s head is ready now.
  7. Let’s work on the rabbit’s body. Take another piece of paper. Please check the graphic, fold one side of the paper to make a triangle. Then line up the points and fold another side into a triangle.
  8. Flip it over. Align with the point at the bottom, fold the paper to make a triangle. Then line up the points and fold another side into a triangle.
  9. Align with the points in the middle, then fold the shape into half to create a rabbit’s body. Put the rabbit’s head on the top of the body. The basic shape of rabbit is ready.

Ideas:

  • Roylco’s R15219 Elemetary Origami Animals pack provides different patterns and bright colors of origami paper. Contrasting colors are printed on the reverse side. Use the fun bright paper to create your own designs.
  • You can draw different cute facial features on the rabbit. Or you can use other craft paper to cut out the features and glue them on the rabbit.
  • Check out our blog post on “How to make origami carrots” and make a couple of carrots for your rabbits.
  • Display the rabbits somewhere festive, hide them around the house, or around the neighborhood where friends might find them.
  • Punch a hole at the back of the rabbit. Thread a piece of yarn with all the rabbits you make. Hang the rabbits from the ceiling or use them to decorate bulletin boards, doors and hallways!

Please visit http://roylco.com/shop/15219-elementary-origami-animals

for more information.

A Pot Of Gold for St. Patrick’s Day

Are you looking for craft ideas for St. Patrick’s Day? Create some decorations to make the house and classroom more festive. Lets make a spiral rainbow and pot of gold.

Age: 4+

Duration: 5 minutes

Learning Outcomes: Exercise fine motor skills. holiday activities. Makes a perfect take-home craft.

You’ll Need:

Choose your favorite pattern from Roylco’s R15295 Rainbow Paper Pack.

Draw a spiral at the back of the paper.

You can also glue two pieces of rainbow paper together to create a double-sided sprital.

Use scissors to cut from the end of the outline toward the center to make a spiral.

Take two pieces of metallic paper from Roylco’s R15409 Economy Metallic Paper Pack.

I choose dark green paper to make the pot, and the gold colored paper for the golden coins. Draw the shape of a pot at the back of the green paper, and cut it out. Make the coins by cutting out some circle shapes from the gold paper. Then glue the golden coins on to the green pot.

After you finish making a pot of gold, you can glue it to the end of the rainbow.  Once complete, hang from ceilings, on bulletin boards or anywhere that could use some extra color.


You are the pot of gold at the end of my rainbow!

Thank You 2013 Art Camp Kids!

Group ShotToday’s post is a little bit different than our regular series of posts! The folks at Roylco enjoyed a fantastic summer art camp in 2013 thanks to our brilliant art campers. Using our classroom materials, the group completed a variety of amazing projects. We would like to say, “Thank you!” to all of our campers and showcase some of our favorite moments from the camp! Continue reading

Paint Bellows Tree

P7290065feature

Use process-based methods to create colorful tree artwork! The techniques used involve materials such as Paint Bellows, fingerpaint and Squiggle Pipettes, all combined to give your students an exercise in fine motor development while enjoying the result of the final image.  Continue reading

Craft Spotlight: Super Snowflake Stencils

Feature-Image-SnowflakestencilsIf you want to give some pizzazz to your winter-themed artwork, check out our Super Snowflake Stencils! We’ve created an assortment of beautiful snowflake designs that your students can use again and again! Continue reading

Craft Spotlight: Sensory Collage Kit

Feature-Image-SensoryCollageWELCOME BACK TO 2014! We are ecstatic to begin the New Year with a plethora of craft ideas, guest posts and so much more! To start off, I’ve decided to post on our Sensory Collage Kit–filled with a variety of colorful materials to add brilliance, texture and fun to your students’ collage projects! Continue reading

Craft Spotlight: Alphabet Pasting Pieces

Feature-Image-alphapastingpiecesThis week’s Craft Spotlight highlights our Alphabet Pasting Pieces as we get set for literacy activities! Use this literacy tool as an introduction to letter recognition, letter order and to help students construct new words.

Continue reading